How to Clean a Dog's Ears Safely at Home
The Complete Guide to Safely Cleaning Your Dog’s Ears at Home
Cleaning a dog’s ears safely at home involves using a veterinarian-approved ear cleaning solution, gently massaging the base of the ear to loosen debris, and allowing your dog to shake before wiping the outer ear canal with cotton balls—never inserting anything deep into the ear canal. This preventive care routine, when performed correctly every 1-4 weeks depending on your dog’s breed and ear type, significantly reduces the risk of painful ear infections and maintains optimal ear health.
🏥 Veterinary Disclaimer
This article provides general educational information about canine ear care. While the techniques described are widely recommended by veterinary professionals, individual dogs may have specific health conditions requiring customized care. Always consult your veterinarian before starting any new ear cleaning routine, especially if your dog shows signs of ear infection (redness, odor, discharge, head shaking, or pain). Never clean ears that appear inflamed or infected without professional guidance.
Understanding Canine Ear Anatomy and Why Regular Cleaning Matters
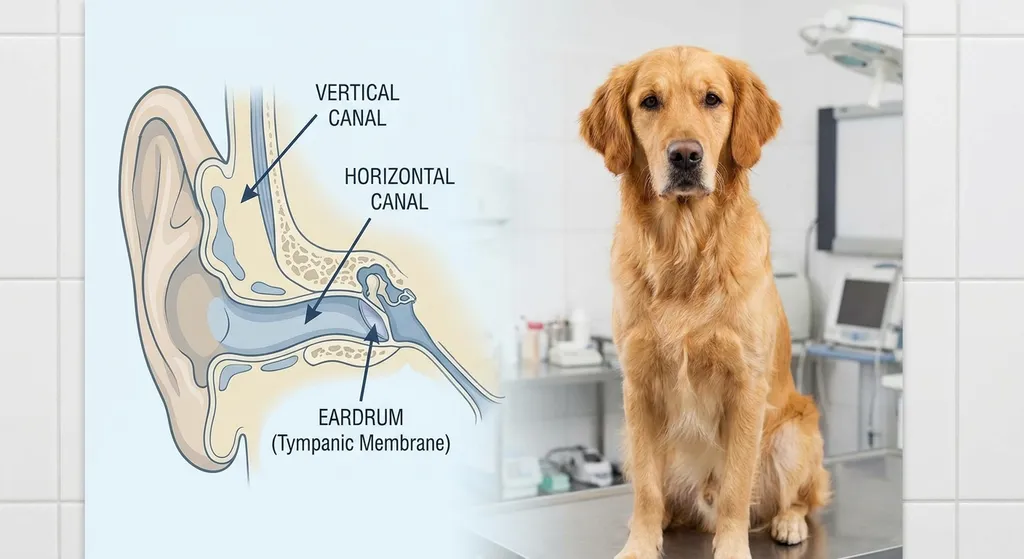
Dogs possess an L-shaped ear canal that differs significantly from the straight canal found in humans. This unique anatomical structure creates an environment where moisture, debris, wax, and microorganisms can accumulate in the horizontal portion of the canal, making dogs particularly susceptible to ear problems.
According to the American Kennel Club (AKC), ear infections rank among the top reasons for veterinary visits, affecting approximately 20% of dogs at some point in their lives. Regular preventive cleaning reduces this risk substantially by removing the buildup before bacterial or yeast overgrowth occurs.
Breeds Most Prone to Ear Issues:
- Floppy-eared breeds: Cocker Spaniels, Basset Hounds, Golden Retrievers, Labrador Retrievers
- Dogs with narrow ear canals: Shar-Peis, Chow Chows
- Water-loving breeds: Any breed that swims frequently
- Dogs with excessive hair growth in ears: Poodles, Schnauzers, Shih Tzus
How to Clean a Dog’s Ears Safely at Home: Step-by-Step Process
Preparation Phase
Before beginning the cleaning process, gather all necessary supplies and create a calm environment. Dogs can sense anxiety, so approaching this task with confidence and patience ensures a positive experience.
Required Supplies:
- Veterinarian-approved ear cleaning solution (never use hydrogen peroxide, alcohol, or vinegar-based solutions)
- Cotton balls or gauze pads (never cotton swabs/Q-tips for deep cleaning)
- Clean towels
- High-value treats for positive reinforcement
- Optional: Helper to gently restrain larger or anxious dogs
The Cleaning Process
Step 1: Position Your Dog Comfortably
Choose a location with good lighting. For small dogs, a table with non-slip surface works well. Larger dogs can be cleaned while sitting or standing on the floor. Position yourself so you can easily access the ear while your dog remains comfortable.
Step 2: Examine the Ear
Before applying any solution, visually inspect the outer ear and the portion of the canal you can see. According to PetMD, healthy ears should be light pink, odor-free, and contain minimal clear or light-yellow wax.
Warning signs requiring veterinary attention instead of home cleaning:
- Dark, crusty, or excessive discharge
- Foul or yeasty odor
- Redness or swelling
- Signs of pain when touching the ear
- Bleeding or visible wounds
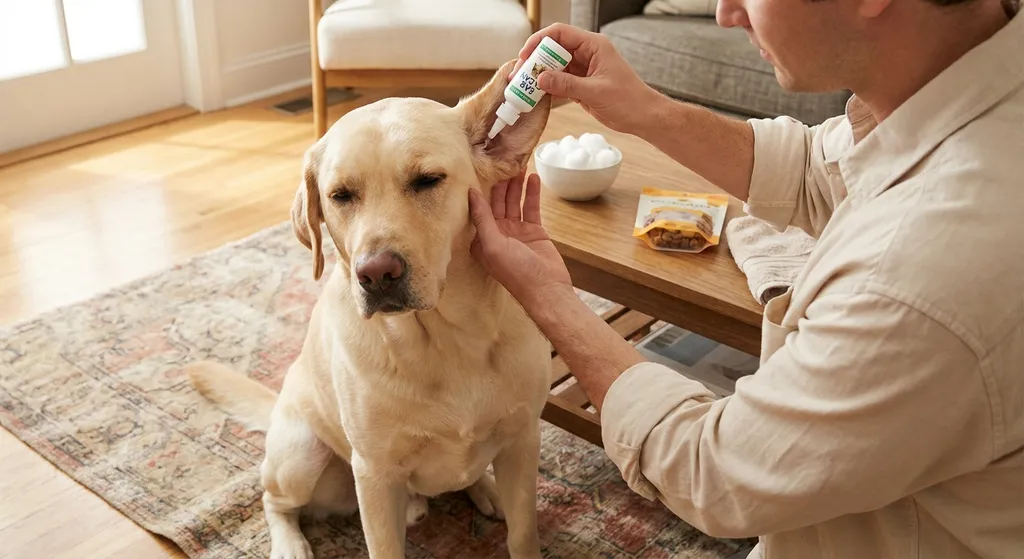
Step 3: Apply the Cleaning Solution
Hold the ear flap gently upward to straighten the ear canal. Fill the ear canal with the cleaning solution until you see it pooling at the opening—this typically requires more solution than most pet owners expect. Don’t worry about using too much; the excess will drain out.
Step 4: Massage the Ear Base
With the solution inside, gently massage the base of the ear (the cartilage area at the bottom of the ear where it meets the head) for 20-30 seconds. You should hear a squishing sound as the solution breaks up debris and wax. This massage is the most critical step for effective cleaning.
Step 5: Allow Your Dog to Shake
Step back and let your dog shake their head vigorously. This natural response propels debris and excess solution out of the ear canal. Have towels ready to protect your surroundings.
Step 6: Wipe the Outer Canal
Using cotton balls or gauze, gently wipe the outer ear canal and ear flap, removing the dislodged debris and solution. Never insert anything deep into the ear canal—wipe only the areas you can see. Replace the cotton ball when it becomes dirty and continue until it comes away relatively clean.
Step 7: Reward and Repeat
Immediately reward your dog with treats and praise. Repeat the process with the other ear.
Selecting Safe Dog Ear Cleaning Solutions
Veterinarian-Approved Commercial Solutions
Professional ear cleaners contain specific ingredients designed for canine ear health. The AKC recommends products containing:
| Ingredient Type | Purpose | Best For |
|---|---|---|
| Salicylic acid | Breaks down wax and debris | Routine maintenance |
| Lactic acid | Maintains proper pH balance | Preventing bacterial growth |
| Eucalyptol | Natural antimicrobial | General cleaning |
| Aloe vera | Soothes irritation | Sensitive ears |
| Glycerin | Moisturizes and protects | Dry, flaky ears |
Top Recommended Brands (According to Veterinary Professionals):
- Virbac Epi-Otic Advanced Ear Cleaner
- Zymox Ear Cleanser
- VetWELL Ear Cleaner
- Pet MD Ear Cleaner Wipes
Safe Homemade Ear Cleaner Recipe
While commercial solutions are preferred, a simple homemade option can be used for routine maintenance in healthy ears:
Gentle Saline Solution:
- 1 cup warm distilled water
- 1/2 teaspoon non-iodized salt
- Mix until salt dissolves completely
- Use within 24 hours, discard unused portion
Important: Never use the following in dog ears:
- Hydrogen peroxide (causes irritation and tissue damage)
- Alcohol (painful and drying)
- Vinegar or apple cider vinegar (alters pH dangerously)
- Essential oils (toxic to dogs and irritating)
Cleaning Dog Ears at Home: Frequency Guidelines
The appropriate cleaning frequency depends on multiple factors specific to your individual dog.
Breed-Based Recommendations:
| Dog Type | Recommended Frequency |
|---|---|
| Floppy-eared breeds | Weekly to bi-weekly |
| Upright-eared breeds | Every 3-4 weeks or as needed |
| Swimmers | After each swimming session |
| Dogs with chronic ear issues | As directed by veterinarian (often 2-3 times weekly) |
| Healthy dogs with no issues | Monthly or every 4-6 weeks |
According to PetMD, over-cleaning can be as problematic as under-cleaning. Excessive cleaning disrupts the ear’s natural protective mechanisms and can cause irritation. The ear canal should maintain a small amount of wax, which provides natural protection against infections.
Dog Ear Infection Prevention Through Proper Care
Maintaining clean, dry ears forms the foundation of ear infection prevention. However, comprehensive ear health requires a multifaceted approach.
Environmental and Lifestyle Factors
Moisture Management: Moisture creates the perfect environment for bacterial and yeast overgrowth. After bathing or swimming, always dry your dog’s ears thoroughly:
- Insert a cotton ball into the outer ear canal to absorb water
- Use a clean, dry towel to wipe the ear flap and visible canal
- Some veterinarians recommend ear-drying solutions for chronic swimmers
- Consider ear covers or plugs during baths for dogs prone to infections
Hair Management: Dogs with excessive ear canal hair require regular plucking or trimming. This hair traps moisture and debris, preventing proper air circulation.
- Professional groomers can pluck ear hair safely
- Veterinarians can demonstrate proper technique
- Never pluck if ears are inflamed or infected
- Some breeds require this monthly, others quarterly
Diet and Allergies: Food allergies frequently manifest as chronic ear infections. PetMD notes that dogs with food sensitivities often develop red, itchy ears that become infected secondarily.
Signs of allergy-related ear problems:
- Recurring infections despite proper cleaning
- Both ears affected simultaneously
- Other allergy symptoms (itchy skin, paw licking, digestive issues)
- Seasonal patterns of ear problems
Recognition of Early Warning Signs
Early intervention prevents minor issues from becoming serious infections requiring antibiotics or even surgery.
Normal vs. Abnormal Ear Characteristics:
| Healthy Ears | Problem Indicators |
|---|---|
| Light pink color | Red or inflamed tissue |
| Minimal clear/light yellow wax | Dark, crusty, or excessive discharge |
| No odor or mild clean scent | Foul, musty, or sweet yeasty smell |
| Dog comfortable with touch | Head shaking, scratching, pain when touched |
| Dry to slightly moist | Excessively wet or sticky |
Special Considerations for Different Dog Types
Puppies and Senior Dogs
Puppies: Begin ear handling and gentle cleaning early to acclimate puppies to the process. Use extremely gentle techniques and make sessions brief, positive experiences. Puppies with floppy ears that will eventually stand upright (like German Shepherds) may need more frequent cleaning during the ear-standing phase.
Senior Dogs: Older dogs may develop arthritis making positioning difficult, or cognitive decline causing anxiety during grooming. Adapt your technique:
- Allow senior dogs to lie down comfortably
- Take more frequent breaks
- Use extra padding for joint comfort
- Consider two-person approach for very large or arthritic dogs
Dogs with Chronic Ear Problems
Dogs with recurring infections require specialized care beyond routine cleaning. Veterinarians may prescribe:
- Medicated ear cleaners containing antifungal or antibacterial agents
- More frequent cleaning schedules
- Ear cytology to identify specific pathogens
- Long-term management plans including diet modification
Never clean ears during active infection without veterinary guidance. Cleaning infected ears can drive bacteria deeper into the canal or even rupture the eardrum if infection is severe.
Common Mistakes to Avoid When Cleaning Dog Ears
Understanding what NOT to do prevents serious complications.
Critical Errors:
-
Using cotton swabs deep in the canal: Q-tips push debris deeper and risk eardrum damage. The dog’s L-shaped canal means you cannot see where the swab is going.
-
Cleaning too frequently: Over-cleaning strips protective wax and oils, ironically increasing infection risk.
-
Using inappropriate solutions: Human ear products, hydrogen peroxide, and alcohol cause pain and tissue damage.
-
Cleaning infected ears: Active infections require veterinary treatment. Home cleaning can worsen the condition.
-
Forcing the process: If your dog shows extreme stress or fear, stop and consult a professional trainer or veterinarian about desensitization techniques.
-
Ignoring professional help: If home cleaning doesn’t maintain clean ears, or if problems recur, professional intervention is necessary.
-
Not drying after water exposure: Leaving moisture in ears after swimming or bathing is the leading cause of preventable ear infections.
Training Your Dog to Accept Ear Cleaning
Dogs don’t naturally enjoy ear cleaning, but proper conditioning creates a cooperative, even pleasant experience.
Desensitization Protocol
Week 1-2: Touch Desensitization
- Gently touch ears during petting sessions
- Immediately reward with high-value treats
- Gradually increase duration of ear touching
- Lift ear flaps briefly, then treat
Week 3-4: Equipment Introduction
- Show cleaning solution bottle, then treat
- Touch cotton balls to ears, then treat
- Practice positioning dog as you would for cleaning
- Keep sessions under 2 minutes
Week 5-6: Process Simulation
- Go through full cleaning motions without solution
- Massage ear base gently, reward heavily
- Practice “shake” command to desensitize to head shaking
- Gradually introduce actual cleaning with one ear at a time
Ongoing Maintenance:
- Always use treats before, during, and after cleaning
- Never punish or scold during ear care
- Keep sessions calm and positive
- If dog becomes fearful, return to earlier desensitization steps
Advanced Topics: When Professional Help Is Necessary
Certain situations always require veterinary intervention rather than home care.
Veterinary Ear Cleaning vs. Home Cleaning
Professional cleaning differs significantly from home maintenance:
Veterinary Deep Cleaning:
- Can safely clean deeper into the canal under visualization
- Uses specialized equipment (otoscopes, video otoscopes)
- May sedate dogs for thorough cleaning without stress
- Can identify and remove foreign objects (grass awns, ticks)
- Performs ear cytology to identify specific infections
- Prescribes appropriate medications for diagnosed conditions
Signs Requiring Immediate Veterinary Attention
Contact your veterinarian immediately if you observe:
- Blood or bloody discharge from the ear
- Sudden hearing loss or lack of response to sounds
- Facial paralysis or drooping on one side
- Balance problems or head tilt (signs of inner ear infection)
- Extreme pain causing aggression or severe distress
- Swelling of the ear flap (aural hematoma)
- Persistent scratching causing skin damage around ears
- Failed response to prescribed medications
Chronic Ear Disease Management
Dogs with ongoing ear issues may require:
Surgical Interventions:
- Lateral ear resection (opening the ear canal for better drainage)
- Total ear canal ablation (complete canal removal in severe cases)
- These procedures are last resorts after medical management fails
Long-term Medical Management:
- Regular veterinary ear flushes under sedation
- Allergy testing and immunotherapy
- Prescription diet trials
- Ongoing topical medications
Frequently Asked Questions About Safely Cleaning Dog Ears at Home
How often should I clean my dog’s ears if they seem perfectly healthy?
For dogs with healthy, upright ears and no predisposing factors, monthly cleaning or even every 4-6 weeks suffices. According to the AKC, over-cleaning disrupts the ear’s natural protective environment. The key is monitoring rather than adhering to a rigid schedule—if ears look clean, smell normal, and your dog shows no discomfort, they may not need cleaning yet. Floppy-eared breeds and swimmers require more frequent attention (weekly to bi-weekly), while breeds with naturally clean ears like many terriers may need cleaning only every 6-8 weeks. The best approach is establishing a checking routine: examine ears weekly, clean only when needed.
Can I use baby wipes or human ear drops to clean my dog’s ears?
Never use baby wipes or human ear products on dogs. Baby wipes contain fragrances, alcohol, and chemicals that irritate the delicate ear canal tissue and disrupt the ear’s pH balance. Human ear drops are formulated for the straight human ear canal and often contain ingredients inappropriate or toxic for dogs, including hydrogen peroxide which causes painful tissue damage. PetMD emphasizes that dogs require species-specific products with proper pH levels (between 4.0-5.0) and ingredients safe for the unique canine ear environment. Veterinary ear cleaners are inexpensive and specifically designed to work with canine ear anatomy and physiology. Using inappropriate products saves money short-term but often leads to expensive infections and veterinary bills later.
What should I do if my dog absolutely refuses to let me clean their ears?
Dogs who resist ear cleaning may have had negative past experiences or may be experiencing ear pain making handling uncomfortable. First, have your veterinarian examine the ears to rule out infection or injury causing the resistance. If ears are healthy, implement a gradual desensitization program over several weeks: start by simply touching the ears during positive experiences like feeding or play, rewarding immediately with high-value treats. Progress slowly to lifting ear flaps, then to touching the ear opening with dry cotton balls, eventually working up to the full cleaning process. Some dogs respond well to professional groomer handling for ear cleaning, as the new person and environment can reset negative associations. For severely anxious dogs, veterinarians can demonstrate proper restraint techniques or prescribe anti-anxiety medications for grooming sessions. Never force the process, as this creates lasting fear and can result in bites even from normally gentle dogs.
Is it normal for my dog’s ears to smell slightly after cleaning?
A mild, clean scent or very slight wax smell immediately after cleaning is normal, as residual cleaning solution and loosened wax remain in the outer canal. However, if a strong or foul odor persists 24 hours after cleaning, this indicates an underlying problem. According to veterinary dermatology specialists, healthy ears should have either no discernible odor or a very subtle, non-offensive smell. Yeasty (sweet, musty), rotten, or particularly foul odors signal infection requiring veterinary diagnosis. Additionally, if the smell worsens after cleaning or returns within just a few days of cleaning, the ear likely has bacterial or yeast overgrowth that home cleaning alone cannot resolve. In these cases, ear cytology performed by your veterinarian identifies the specific organism causing the problem, allowing targeted antibiotic or antifungal treatment rather than continued ineffective home cleaning.
Final Recommendations
Mastering the technique of cleaning a dog’s ears safely at home empowers pet owners to provide essential preventive care, potentially saving hundreds of dollars in veterinary costs and preventing painful infections. The process requires patience, proper supplies, and commitment to gentle, positive techniques. Remember that routine cleaning maintains healthy ears but cannot treat infections—knowing when to seek professional help is equally important as knowing proper home care techniques.
Start slowly, especially with puppies or newly adopted dogs, building positive associations with ear handling. Monitor your dog’s ears weekly even if you don’t clean them that frequently, intervening early when problems arise. With consistent, careful attention, most dogs can maintain excellent ear health throughout their lives with simple home maintenance supplemented by regular veterinary check-ups.
When in doubt, consult your veterinarian. Every dog is an individual with unique needs, and professional guidance ensures you’re providing the best possible care for your specific companion.